
What is a Hard Disk Drive?:
The hard disk drive is the main, and usually largest, data storage device in a computer. The operating system, software titles and most other files are stored in the hard disk drive.

The Hard Disk Drive is Also Known As:
HDD (abbreviation), hard drive, hard disk, fixed drive, fixed disk, fixed disk drive
Important Hard Disk Drive Facts:
The hard drive is sometimes referred to as the "C: drive" due to the fact that Microsoft Windows designates the "C" drive letter to the primary partition on the primary hard drive in a computer by default. While this is not a very technically correct term to use, it is still common. For example, some computers have multiple drive letters (i.e. C, D, E) representing areas across one or more hard drives.
Popular Hard Disk Drive Manufacturers:
Hard Disk Drive Description:
A hard drive is usually the size of a paperback book but much heavier.
The sides of the hard drive have pre drilled, threaded holes for easy mounting in the 3.5 inch drive bay in the computer case. Mounting is also possible in a larger 5.25 inch drive bay with an adapter available at computer supply stores. The hard drive is mounted so the end with the connections faces inside the computer.
The back end of the hard drive contains a port for a cable that connects to the motherboard. The type of cable used will depend on the type of drive but is almost always included with a hard drive purchase. Also here is a connection for power from the power supply.
Most hard drives also have jumper settings on the back end that define how the motherboard is to recognize the drive when more than one is present. These settings vary from drive to drive so check with your hard drive manufacturer for details.
Troubleshooting Hard Disk Drives
Typical symptoms associated with hard disk drive failures include the following:
- The front panel indicator lights are visible, and the display is present on the monitor screen, but there is no disk drive action and no bootup.
- The computer boots up to a system disk in the A drive, but not to the hard drive, indicating that the system files on the hard disk drive (HDD) are missing or have become corrupt.
- The computer does not boot up when turned on.
- An IBM-compatible 17xx error code is produced on the display.
- No motor sounds are produced by the HDD while the computer is running. (In desktop units, the HDD should generally always run when power is applied to the system—however, this does not apply to all desktops or portables when advanced power-saving features are used.)
- A HDD Controller Failure message appears, indicating a failure to verify hard disk setup by system configuration file error.
- A C: or D: Fixed Disk Drive error message appears, indicating a hard disk CMOS setup failure.
- An Invalid Media Type message appears, indicating the controller cannot find a recognizable track/sector pattern on the drive.
- A No Boot Record Found, a Nonsystem Disk or Disk Error, or an Invalid System Disk message appears, indicating that the system boot files are not located in the root directory of the drive.
- The video display is active, but the HDD's activity light remains on and no bootup occurs, indicating that the HDD's CMOS configuration information is incorrect.
- An Out of Disk Space message appears, indicating that the amount of space on the disk is insufficient to carry out the desired operation.
- A Missing Operating System or a Hard Drive Boot Failure message appears, indicating that the disk's MBR is missing or has become corrupt.
- A Current Drive No Longer Valid message appears, indicating that the HDD's CMOS configuration information is incorrect or has become corrupt.
HDD Configuration Checks
While booting up the system, observe the BIOS's HDD type information displayed on the monitor. Note the type of HDD that the BIOS recognizes as being installed in the system. Possible error messages associated with HDD configuration problems include the Drive Mismatch Error message and the Invalid Media Type message.
Check the drive to ensure that it is properly terminated. Every drive type requires a termination block somewhere in the interface. For Integrated Drive Electronics (IDE) drives, check the Master/Slave jumper setting to ensure it is set properly for the drive's logical position in the system. Remember that there can only be one master drive selection on each IDE channel. If both drives share an interface and are set to the same selection, neither drive should work.
If you have more than one device attached to a single interface cable, be certain that they are of the same type (for example, all are Enhanced Integrated Drive Electronics [EIDE] devices or all are ATA100 devices). Mixing IDE device types creates a situation in which the system cannot provide the different types of control information each device needs. The drives are incompatible and you might not be able to access either device.
If the drive is a SCSI drive, check to see that its ID has been set correctly and that the SCSI chain has been terminated correctly. Either of these errors results in the system not being able to see the drive. Check the CMOS setup utility to ensure that SCSI support has been enabled along with large SCSI drive support.
Basic HDD Checks
The first task is to determine how extensive the HDD problem is. Place a clean boot disk or an emergency start disk in the A drive and try to boot the system. Then execute a DIR command to access the C drive. If the system can see the contents of the drive, the boot files have been lost or corrupted, but the architecture of the disk is intact.
Modify the DIR command with an /AH or /AS switch (that is, DIR C: /AH or DIR C: /AS) to look in the root directory for the system files and the COMMAND.COM file. It is common to receive a Disk Boot Failure message onscreen if this type of situation occurs.
In Windows 9x and Windows Me systems, if the clean boot disk has a copy of the FDISK program on it, attempt to restore the drive's MBR (including its partition information) by typing the following:
Providing that the hard disk can be accessed with the DIR command, type and enter the following command at the DOS prompt (with the clean boot disk still in the A drive):
This command copies the IO.SYS, MSDOS.SYS, and COMMAND.COM system files from the boot disk to the hard disk drive. Turn off the system, remove the boot disk from the A drive, and try to reboot the system from the hard drive.
If the system cannot see the drive after booting from the floppy disk, an Invalid Drive message or an Invalid Drive Specification message should be returned in response to any attempt to access the drive. In Windows 9x systems, use the FDISK utility to partition the drive. Next use the FORMAT /S command to make the disk bootable. Any data that was on the drive is lost in the formatting process, but it was already gone because the system could not see the drive.
The process for checking the hard drive on a Windows NT, Windows 2000, or Windows XP computer is similar to the one for checking a Windows 9x-based system. In Windows NT and Windows 2000, the partitioning process is performed through the Disk Administrator and Disk Management utilities, respectively. These utilities perform all of the basic functions that the FDISK utility does. For instance, both utilities can be used to partition drives and both show you the basic layout of the system's disks.
These disk utilities can also provide advanced functions associated with enterprise (large-scale, business-oriented) computing systems. The Disk Administrator and Disk Management utilities can be used to create both traditional primary and extended partitions for MS-DOS/Windows 9x systems or for Windows NT and Windows 2000 systems. They can also be used to create volumes (partitions that involve space on multiple physical drives).
The Windows 2000 and Windows XP Disk Management snap-in, depicted in Figure 3.10, is located under the Computer Management console. To access the Disk Management snap-in, click Start, Settings, Control Panel, Administrative Tools. Double-click the Computer Management icon, and then click the Disk Management entry. Because working with volumes is a major administrative task, you must be logged on as an administrator or as a member of a Windows 2000 Administrators group to carry out this procedure.
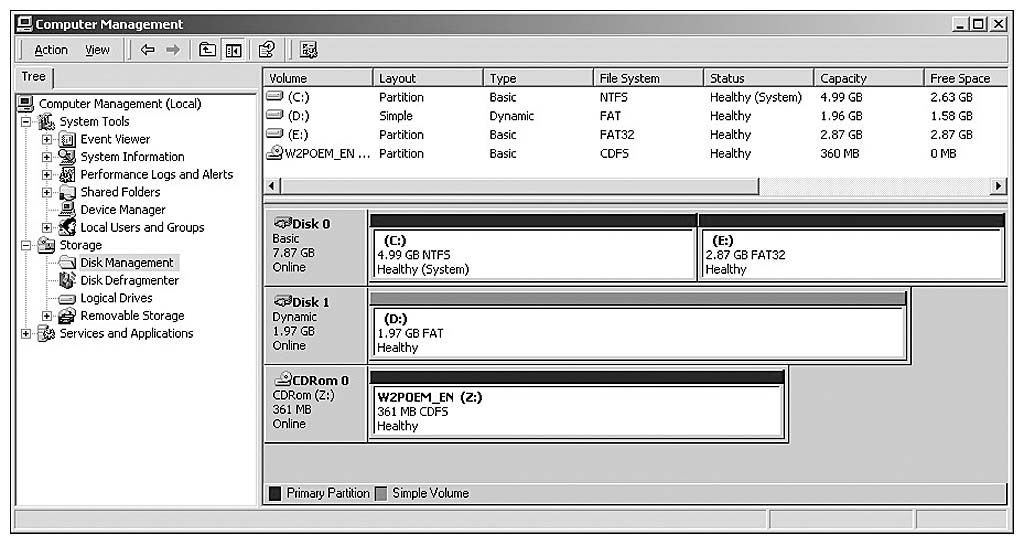
Figure 3.10 Windows 2000 Disk Management snap–in.
Formatting Volumes in Windows 2000 and Windows XP
Formatting a partition or volume prepares the logical structure to accept data by creating the file system in it. If a partition or volume has not been formatted, it does not contain a file system and it cannot be accessed through the operating system or any applications. In the Windows 2000 and Windows XP environment, you can perform many actions to initiate formatting, including the following:
- Use the Volume Creation Wizard in the Disk Management utility when the volume is created.
- In the Disk Management utility, right-click a volume that has already been created, and then click Format from the shortcut menu.
- In Windows Explorer, right-click the desired drive letter, and then click Format from the shortcut menu.
- At a command prompt, type the command Format along with the appropriate switches.
CAUTION
If you format an existing partition or volume, any data residing in the structure is lost. The Windows XP Professional operating system protects its system files by preventing the system and boot partitions from being formatted.
HDD Hardware Checks
If you cannot access the hard disk drive, and its configuration settings are correct, you must troubleshoot the hardware components associated with the hard disk drive. These components include the drive, its signal cable, and the Hard Disk Controller (HDC) on the system board.
Check the HDD signal cable for proper connection at both ends. Exchange the signal cable for a known-good one. Check the Master/Slave jumper settings to ensure they are set correctly. Determine whether the system is using the Cable Select option. This setting enables the system to dynamically assign the master/slave arrangements for multiple IDE drives. Likewise, check the ID configuration settings and terminator installations for SCSI drives.
Although it might seem logical to replace the hard drive unit at this point, it is quite possible that the hard drive might not have any real damage. It might have simply lost track of where it was, and now it cannot find its starting point. In this case, the most attractive option is to reformat the hard disk. This action gives the hard drive a new starting point from which to work. Unfortunately, it also destroys anything that you had stored on the disk.
If the reformatting procedure is not successful, or the system still doesn't boot from the hard drive, replace the hard disk drive unit with a working one.
ReplyDeletenice blog..
Best wireless router