
Random Access Memory (RAM) is the "working memory" in a computer. Additional RAM allows a computer to work with more information at the same time which can have a dramatic effect on total system performance.
RAM is Also Known As:
main memory, internal memory, primary storage, memory "stick", RAM "stick"
Important RAM Facts:
RAM is typically referred to simply as "memory" even though other types of memory may exist inside a computer.
Each motherboard supports only a certain range of memory types in certain combinations so always check with your motherboard manufacturer before making a purchase.
Popular RAM Manufacturers:
RAM Description:
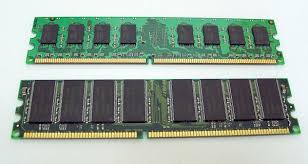
A standard "module" or "stick" of desktop memory is long, thin and resembles a short ruler. The bottom of the memory module has one or more notches to guide for proper installation and is lined with numerous, usually gold-plated connectors.
Memory is installed in memory module slots located on the motherboard. These slots are easily locatable by looking for the small hinges on either side that lock the memory in place. Certain sizes of modules may need to be installed in certain slots so always check with your motherboard manufacturer before purchase or installation.
Memory modules come with various storage capabilities. Modern memory modules can be purchased in 256MB, 512MB, 1GB, 2GB, and 4GB sizes.
How to Troubleshoot RAM
Does your computer suffer from random freezes or inexplicable crashes? While these could be caused by various underlying problems, one factor that can be ruled out with a little troubleshooting is your computer's memory chips, known as RAM. This guide will show you how to check for problems with your RAM quickly and easily.
Instructions
Things You'll Need:
- Your PC (obviously!)
- Memtest86+ memory testing software
- Compressed air duster
- Pencil eraser
- Step 1Some problems might be caused by dust, dirt, or oxidation on your RAM sticks. Fortunately, computers are easy to clean. Before opening your computer, always turn off all power to it, and touch an earthed metal object to remove any static electricity in your body to prevent a static spark from damaging components. You may even want to use a special anti-static wrist strap, which you will find in any good electronics store, along with the air duster you'll need later.
- Step 2

Typical RAM stick
Open up your computer and locate the RAM sticks on your motherboard (see image above) - check the manual for your motherboard if you are unsure (if you don't have a manual, note the make and model which are printed on the motherboard, you should be able to get the manual from the manufacturer's website). There are usually only one or two RAM sticks, but there might be up to four.
- Step 3Remove the RAM sticks by gently but firmly pressing down the levers on either end of the RAM slot. Note which slots you are removing the sticks from, as you'll need to replace them later. Once the RAM is out, place it on a clean, non-metallic surface and use the air duster to remove any dust from the RAM stick and the RAM slots on the motherboard (you may want to take this opportunity to remove the dust from inside your computer in general!).
- Step 4

FItting RAM; the levers should be fully upright when the RAM is in properly.
Check the metal contacts along the bottom of the RAM stick. If they appear tarnished, you can clean them by gently and carefully rubbing them with a pencil eraser. Once they are clean, replace them by carefully pressing the RAM down into the correct slots (you took a note of them earlier, right?) until the levers at each end are fully in place.
- Step 5Now put the case back on your computer, plug in the power and start it up. At this stage your problems may be fixed if dusty RAM was the issue. If not, you'll need to run some tests to determine if your RAM is damaged. Memtest86+ is good software for testing your memory, so go to http://www.memtest.org/ and download Memtest86+ - you'll probably want to get the "Bootable ISO" version, which can be burned onto a CD. Failing that get the "Pre-compiled package for floppy" which has everything you need to put the program on a bootable floppy disk. Continue once you have Memtest86+ on either a CD or a floppy disk.
- Step 6Restart your computer and enter the BIOS setup screen (the key to do this should be indicated at startup, if not consult the motherboard manual). Locate the options which set the boot order for devices in your computer and change it so that either floppy drive or CD drive is first in the order, depending on which type of disk you put Memtest on. Put the Memtest disk into your computer now, and exit the BIOS setup, making sure that your changes are saved.
Step 7Your computer will restart and should now load the Memtest86+ software from the disk you inserted. It will automatically start testing your computer's memory. At this stage it is recommended to leave the test running for a couple of passes, to be sure that any possible faults are located.
Step 8If Memtest reports errors, and you only have one RAM stick, the stick has a fault and should be replaced. If you have more than one RAM stick, you can remove all but one stick from your computer (following the precautions mentioned previously) and test one at a time. This way, you can keep any sticks that test OK and either replace the faulty ones, or simply throw them out make do with less RAM (unless they all test faulty - you need at least one good one!).
If Memtest reports no errors, or replacing/removing faulty RAM sticks doesn't stop your computer crashing or freezing, then your problem lies elsewhere - but at least you know your RAM is healthy now!
Tips & Warnings
-
RAM sticks often have a long or even lifetime warranty. If you find that any are damaged, it's worth checking with the manufacturer to see if you can get a free replacement.
-
Don't use any kind of vacuum cleaner or similar appliance to clean inside your computer. Vacuum cleaners have motors in them, and motors tend to create a lot of static electricity, which can easily damage electronic components.
-
Don't try to clean your computer with anything wet, such as water, household cleaning chemicals etc.
-
If you don't feel comfortable performing internal maintenance on your own computer, TAKE IT TO A QUALIFIED TECHNICIAN. The last thing you want to do is mess up the job and ruin your computer.
Another way to check your RAM.
How to install - Upgrade RAM (Memory)
ReplyDeletenice blog..
Best wireless router